

This post is part of Purse Palooza 2013.
For full schedule of guest post pattern reviews and prizes, click here!
Julianna from Sewing Under the Rainbow is one of my favorite quilters; I feel like she has a touch with patterns/fabric that no one else has! She’s a fantastic paper-piecer as well! Check out her blog to see more!
Hi everyone! My name is Julianna and I blog over at Sewing Under Rainbow. I’m honoured that Sara invited me to be a part of Purse Palooza. Last year I had a lot of fun and this year wasn’t different!
I reviewed the Gadabout bag pattern by Studio Kat Designs. I chose this pattern, because the Gadabout bag has very original look and I just knew I will love it!

1. What fabric/supplies were needed to make the bag?
To make this bag you’ll need fabrics & supplies that usually are needed in bag making: exterior and lining fabrics, magnetic snap, interfacing, zippers, thermofleece and cotton webbing. The only a bit unusual supply is the extra wide double folded bias tape, which is used inside the bag and the contrasting bias tape used on the outside to decorate the bag.
Kat advices that this pattern works the best with more heavy weight fabrics, although quilting weight fabrics will be also great.
So I decided not to use quilting fabrics for exterior and try something different this time – thick corduroy. Quilting weight fabrics were used only for the lining.
2. What did you think of the illustrations and instructions?
Instructions are very clear and the illustrations are very helpful (especially for international bag makers like me). What I particularly liked is the fact that the pattern comes in a plastic bag. This is very helpful storage solution. After cutting the templates you can put it in the plastic bag – you won’t lose templates and it will be neatly stored!

Kat recommends to read the pattern before starting sewing and I couldn’t agree more with it!
3. Did you make any modifications to the pattern?
I promised that I won’t make any modifications to the pattern, but while sewing it occurred that I don’t have any magnetic closures, so I had to use button.
The second modification I made was not using interfacing at all. I used thick corduroy for the exterior, so using interfacing wasn’t necessary (but I added thermofleece to the back of almost every piece of bag). This way it was also easier to complete the bag.
I modified also the decorative part of the bag and instead of using regular bias tape I used selvedge binding. Using this kind of binding is challenging and I didn’t manage to do it perfectly (just see the curves on bag closure), so I regret a bit that I didn’t follow the pattern strictly.
4. What Difficulty Level did you think this pattern was at?
I’m not very experienced in bag making and from my point of view this pattern is at intermediate level or even advanced. The bag it’s not big and beginners could have problems with stitching the main bag pieces together (because of the curves). However, templates could be enlarged and this way the bag will be easier to make.
I tried to make simple bag with something a bit unexpected. I needed bag that will match my gray coat and will look a bit casual, but won’t be ‘flashy’.
Here’s my Gadabout bag:
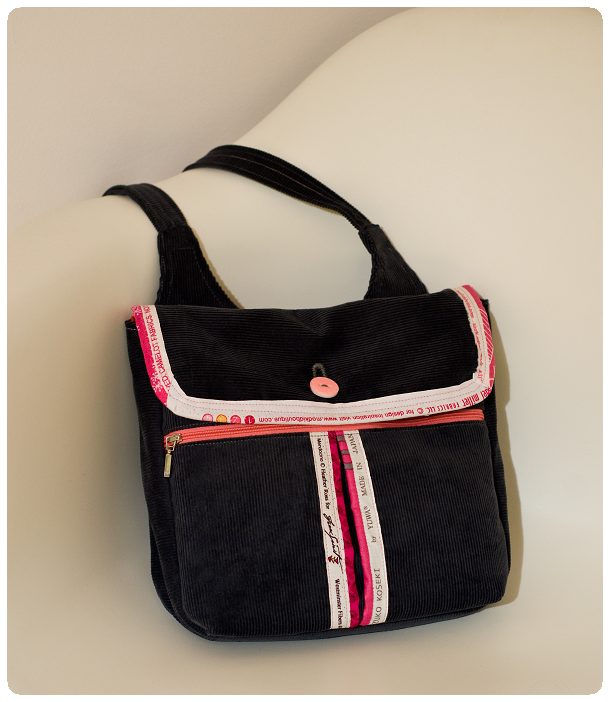
I am really happy that I had opportunity to sew the Gadabout bag! Here are the main pro’s and con’s of this pattern:
Pro’s:
– original look,
– clear and easy to follow instructions,
– a lot of possibilities of alternating the pattern (just imagine backpack made with this pattern – perfect for little ones, just need to make two handles instead of one strap),
– plastic bag which allows neatly storage of pattern.
Con’s
– intermediate or even advanced level.


Your selvedge binding may not be “perfect”, but, I love it! I think your bag is very cute!
Ivied been wanting to make this bag! I’ve got the pattern for another studio cat bag…the one for concealing a gun, and I’m working on it. I found it kinda intermediate advanced myself but mostly I think it is sure to due to the fact that I am not a good pattern reader/assembler and all my pat puses have been built by pictorials (Li e the awesome patterns from Sara Lawson, Erin Erickson and Michelle’s Patterns). It may not be hard for someone that can read patterns better. Thanks for sharing!
I love how your bag came out. Using selvedges was a nice idea and they did come out great
DeeAnn, Hildy, thank you! 🙂
Jake, you might be right. I’m not good pattern reader too:) But for me the most challenging part was stitching the bag together on the curves. I do a lot of curves in patchwork, but not in bags.
Such a beautiful handbag I must say. The tutorial for making the bag is quite simple. I just love the fabrics you used for making the handbag and the bag looks fabulous. Though, I often carry my Kilkenny orla kiely handbag whenever I have to go for outings, but I also love to do experiments with such designer stuffs. As I love art and crafting and I also stitch handbags by my own, so I like the idea you mentioned above. I will definitely try this at my home.